Posts tonen met het label diydrones. Alle posts tonen

zaterdag 10 november 2012

Wireless IP telemetry

The goal of this project is to control (fly) my quadcopter as from a normal pc with a usb joystick or gamepad. The APM Planner ground station software from DIYdrones support IP based telemetry via UDP. The arducopter firmware has build in telemetry code and a dedicated serial connection to send and recieve all data. So we just have to add a serial to wifi module.


My choice is the Lantroni MatchPort® b/g module. Because it can handle high data rates, it has a good tx power and you can connect any type of wlan antenna to maximaze tx/rx distance. But these features make it a bit more heavy then other modules. Compared to other modules it consumes a lot more. But if you want speed, power and distance then you have to deal with this.


Some features:
Wired Ethernet-to-wireless bridging
Bulletproof security with IEEE 802.11i-PSK,WPA-PSK, TKIP and optional 256-bit AES end-to-end encryption
Full TCP/IP stack,web server and Windows deployment software
wlan data rates: 1Mbps up to 54Mbps
Two serial channels: up to 921 Kbps data rate
8 real time general I/O configurable pins
3.3V-level signals
Output Power: 14dBm +2.0 dBm
Receive Sensitivity: -91dBm @ 1Mbps

To get this thing to work with the the diydrones ardupilot I configured it this way:
- cpu performance: low -> this is more than enough performance the handle everything it has to do.
- wlan power management: OFF -> default it is ON but this gives laggy/sturring data stream. Working with udp we want a steady smooth data stream. So make sure to set this to OFF
- wlan data tx rate -> 1mbps -> this is more then enough speed, setting it to 1mbps will give you max range.
- serial 1 protocol: RS232 -> note that is will operate at 3.3v TTL level
- serial 1 baud rate: 57600 -> this is the default confiration in the ardupilote firmware
- enable packing -> enabled (gap time 12ms) -> if you do not enable this fuctions the wifi module will tx data only when the MTU data block is full (1400b) and that will cause a hughe lag in our data stream. So enable this function.
- match 2 byte sequence: yes, 0D & 0A -> adding this will force the wifi to tx data when ar CRLF arrives from the serial data comming from ardupilot.
- send frame immediate: yes

documents about this module can be found on the lantronix website or my google drive

zondag 19 augustus 2012

SkyTraq Sup500f GPS module

First of all, I ported the arducopter v2.5.3 code  to my seeeduino mega board with succes! But because the code that I currently have is not my final release I'll publish it later when everything is finished.

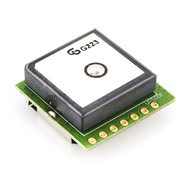
So in this part I will connect my SkyTraq SUP500F Gps module to the seeeduino and see if arducopter works fine. The SUP500F gps module is a product from sparkfun, but at this moment they don't sell it any more:


65 Channel SUP500F 10Hz GPS Receiver with Smart Antenna
65 Channel GPS L1 C/A Code
Perform 8 million time-frequency hypothesis testing per second
Open sky hot start 1 sec
Open sky cold start 29 sec
Signal detection better than -161dBm
Multipath detection and suppression
Accuracy 2.5m CEP
Maximum update rate 10Hz
Tracking current ~33mA

Datasheets and software are available on the sparkfun website but also on my google docs page.
So first of all I connected this module to my usb ftdi board (see previous blogs). Then you can launch the gps viewer software and see if it works. After some testing it's time to configure the gps to work with the arducopter code.

You can fully configure the gps module via the gps viewer pc software. If you make sure that the gps module has the default firmware settings you don't have to configure a lot.
- Set the serial baud to 38400
- that's it!

Now you have to configure the arducopter software.
Place "#define GPS_PROTOCOL                    GPS_PROTOCOL_NMEA" in the APM_config.h file. Compile, upload and connect the GPS module to serial 1 on you arduino mega board. It works ! :)

If it should not work or if you would only like to do a simple test, the arducopter GPS library included a simple arduino test sketch. Go to the AP_GPS library folder, locate the NMEA example sketch. Upload and test the GPS.

zondag 12 augustus 2012

Arducopter to Seeeduino Mega

This project isn't finished yet. So what's next?

I'm currently trying to port the ArduCopter uav platform from Diydrones to my hardware. The ArduCopter multirotor uav platform is opensource and arduino compatible. But the guys from DiyDrones build there own hardware boards.
I did choose this road and stop developing my own quadcopter software, because the arducopter project is open source, has a lot of features and has a very nice pc software (ground station). I think porting this project to my own hardware will take less time the continue with programming my own software.

The arducopter firmware I'll try to port is version 2.5.3. After succes I can maybe take a look at v2.6 or 2.7 But the arducopter requirements say that as from version 2.7 there own, but older APM1 board isn't supported anymore. The APM1 board has an atmega 1280 like my seeeduinomega board. The port that I"m going to do is optimezed for the 1280 chip and not the newer 2560 chip that is shipped with the APM2 board.

A second problem is that the APM1 as well as the APM2 board from diydrones have a extra chip that handles RC input. The data that is recieved from your own RC reciever/transmitter will be read and handled by this second chip. It is clear that on a arduino mega board or on a seeeduino mega board there is only one chip. So for this project I will not be able to fly with a normal RC transmitter. But that is not a problem, because the arducopter PC software can handle joystick input to fly any multicopter. And that is what I already did with my own software :)

in the next blogs I'll give more information and try to give a step by step tutorial.

- first of all you have to download the arducopter firmware
http://code.google.com/p/arducopter/downloads/list

- you need to place all the libraries in you arduino program. Go to the folder where you installed arduino. Locate the libraries folder and copy all arducopter libraries to this folder.

- as from know your arduino pc software is ready to compile the arducopter platform. I'm using arduino v0.22 and v1.0. But note that we still have to make some changes in the firmware itself.